Data Science Nano Degree Capstone Project: Using CNN to predict dog breed

Project Overview
This post is to summarize the capstone project I did for Udacity Data Science Nano Degree Program. The goal of the project is to classify images of dogs according to their breed. CNN (Convolutional neural network) is the methodology used to achieve the target.
The link to the Github Repo is here: https://github.com/jl4730/DogBreed
Problem Statement
The main task is to build an algorithm that accepts user-supplied images as input. If a dog is detected in the image, it will provide an estimate of the dog’s breed. If a human is detected, it will provide an estimate of the dog breed that is most resembling.
Metric
The metric used to evaluate the performance of the CNN model is the accuracy, which is the percentage of correctly classified images in the test data. The reason why the other metrics from the confusion matrix are not used here is that we don’t really have “false positive” or “false negative” here with 133 breeds to classify.
During each iteration, we need to use the parameters trained on the training set to calculate the validation loss and accuracy. At the end of the iterations, the best set of parameters will be applied on the test set and the final accuracy is calculated.
Data Exploration and Visualization
The data used for this project are images of dogs and humans. After loading the data, we know There are 133 total dog categories and 8351 total dog images. Of which 6680 are in training sets, 835 in validation set and 836 are in the test set.
# print statistics about the dataset
print(‘There are %d total dog categories.’ % len(dog_names))
print(‘There are %s total dog images.\n’ % len(np.hstack([train_files, valid_files, test_files])))
print(‘There are %d training dog images.’ % len(train_files))
print(‘There are %d validation dog images.’ % len(valid_files))
print(‘There are %d test dog images.’% len(test_files))
Here are two examples of dog and human being images:


Benchmark model
The benchmark model used here is a 7 layer self-trained CNN model.

This above model is created through python code:
model.add(Conv2D(filters=16, kernel_size=2, activation=’relu’,
input_shape=(224, 224, 3)))
model.add(MaxPooling2D(pool_size=2))
model.add(Conv2D(filters=32, kernel_size=2, activation=’relu’))
model.add(MaxPooling2D(pool_size=2))
model.add(Conv2D(filters=64, kernel_size=2, activation=’relu’))
model.add(MaxPooling2D(pool_size=2))
model.add(GlobalAveragePooling2D())
model.add(Dense(133, activation=’softmax’))model.summary()
After specifying this CNN architecture, I compiled and fit the model.
model.compile(optimizer=’rmsprop’, loss=’categorical_crossentropy’, metrics=[‘accuracy’])
checkpointer = ModelCheckpoint(filepath=’saved_models/weights.best.from_scratch.hdf5',
verbose=1, save_best_only=True)model.fit(train_tensors, train_targets,
validation_data=(valid_tensors, valid_targets),
epochs=epochs, batch_size=20, callbacks=[checkpointer], verbose=1)
Then I loaded the best parameters and test the model accuracy on the test set.
model.load_weights(‘saved_models/weights.best.from_scratch.hdf5’)
# get index of predicted dog breed for each image in test set
dog_breed_predictions = [np.argmax(model.predict(np.expand_dims(tensor, axis=0))) for tensor in test_tensors]# report test accuracy
test_accuracy = 100*np.sum(np.array(dog_breed_predictions)==np.argmax(test_targets, axis=1))/len(dog_breed_predictions)
print(‘Test accuracy: %.4f%%’ % test_accuracy)
This model yield around 5% accuracy, which is better than a random guess (1/133 breed).
Data Preprocessing steps
When using TensorFlow as backend, Keras CNNs require a 4D array (which we’ll also refer to as a 4D tensor) as input, with shape (nb_samples,rows,columns,channels),(nb_samples,rows,columns,channels),
where nb_samples corresponds to the total number of images (or samples), and rows, columns, and channels correspond to the number of rows, columns, and channels for each image, respectively.
The path_to_tensor function below takes a string-valued file path to a color image as input and returns a 4D tensor suitable for supplying to a Keras CNN. The function first loads the image and resizes it to a square image that is 224×224224×224 pixels. Next, the image is converted to an array, which is then resized to a 4D tensor. In this case, since we are working with color images, each image has three channels. Likewise, since we are processing a single image (or sample), the returned tensor will always have shape
(1,224,224,3).(1,224,224,3).
The paths_to_tensor function takes a numpy array of string-valued image paths as input and returns a 4D tensor with shape
(nb_samples,224,224,3).(nb_samples,224,224,3).
Here, nb_samples is the number of samples, or number of images, in the supplied array of image paths. It is best to think of nb_samples as the number of 3D tensors (where each 3D tensor corresponds to a different image) in the dataset!
def path_to_tensor(img_path):
# loads RGB image as PIL.Image.Image type
img = image.load_img(img_path, target_size=(224, 224))
# convert PIL.Image.Image type to 3D tensor with shape (224, 224, 3)
x = image.img_to_array(img)
# convert 3D tensor to 4D tensor with shape (1, 224, 224, 3) and return 4D tensor
return np.expand_dims(x, axis=0)def paths_to_tensor(img_paths):
list_of_tensors = [path_to_tensor(img_path) for img_path in tqdm(img_paths)]
return np.vstack(list_of_tensors)
Implementation
To reduce training time without sacrificing accuracy, the CNN finally used was trained using transfer learning. The general flow is similar to what was shown in the benchmark step. The biggest difference, however, is that we don’t need to train the entire CNN, rather, we can train only the last layer of the network.
At the beginning of transfer learning, we need to obtain bottleneck features:
bottleneck_features = np.load(‘bottleneck_features/DogVGG16Data.npz’)
train_VGG16 = bottleneck_features[‘train’]
valid_VGG16 = bottleneck_features[‘valid’]
test_VGG16 = bottleneck_features[‘test’]
Then we can specify the last convolutional layer through:
VGG16_model = Sequential()
VGG16_model.add(GlobalAveragePooling2D(input_shape=train_VGG16.shape[1:]))
VGG16_model.add(Dense(133, activation=’softmax’))
The rest of the process is the same as in the benchmark step.
Refinement
Instead of using VGG, I finally chose the ResNet-50 model to predict the dog breed, which achieved over 80% accuracy with 20 iterations.
bottleneck_features = np.load(‘bottleneck_features/DogResnet50Data.npz’)
train_Resnet50 = bottleneck_features[‘train’]
valid_Resnet50 = bottleneck_features[‘valid’]
test_Resnet50 = bottleneck_features[‘test’]Resnet50_model = Sequential()
Resnet50_model.add(GlobalAveragePooling2D(input_shape=train_Resnet50.shape[1:]))
Resnet50_model.add(Dense(133, activation=’softmax’))
We can definitely further improve the performance by increasing the number of iterations. I only used 20 and the results are already decent (83% accuracy). It can be even better with more epochs. But for the population with over 100 species, 83% is pretty decent already.
Results
The goal of the project is to predict the breed with user-uploaded images. If a dog is detected in the image, it will provide an estimate of the dog’s breed. If a human is detected, it will provide an estimate of the dog breed that is most resembling. I tested several dog images and the results are quite accurate:

Justification
ResNet-50 is the final choice as the accuracy (83%) almost doubled that of the VGG model(43%). The main reason could be that Resnets are much deeper compared to VGG where Resnet-50 refers to a 50 layers Resnet. If we add more iterations to the transfer learning (currently use 20), the accuracy level will go even higher, which is impressive.
Reflection
In this project, I’ve built a dog breed classifier that can tell the breed of the user-uploaded pictures. Transfer learning was used to take advantage of the pre-trained ResNet-50 model. The project started with a dog detector and a human detector to identify the image type. Then the project went through 3 CNN models: self-trained 6 layer CNN, VGG model, and ResNet-50, of which ResNet is chosen as the accuracy is over 80%.
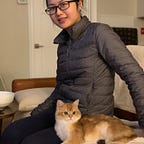
As I don’t have a dog, I can only test my own picture lol. Here is the result.

The model correctly identified me as a human, which is good. But it’s hard to know why I look similar to Akita lol.
Future Improvements
In the future, I can try to increase the number of iterations and see how the accuracy converges in the end. I can also try a different model with even better performance. Then I can deploy a website to upload images and classify them. That will be a lot of fun!